
在这篇文章中,我们将学习如何使用YOLOv3(一种最先进的物体探测器)与OpenCV。
YOLOv3是流行的物体检测算法YOLO的最新变种- 你只看一次。已发布的模型可识别图像和视频中的80个不同对象,但最重要的是它具有超快速且几乎与Single Shot MultiBox(SSD)一样准确。
从OpenCV 3.4.2开始,您可以在自己的OpenCV应用程序中轻松使用YOLOv3模型。
这篇文章主要关注推理,但是如果你想在你的数据集上训练你自己的YOLOv3模型,你会在后续帖子中找到相同的教程。
YOLO如何运作?
我们可以将对象检测器视为对象定位器和对象识别器的组合。
在传统的计算机视觉方法中,使用滑动窗口来寻找不同位置和尺度的物体。因为这是如此昂贵的操作,所以通常假设物体的纵横比是固定的。
基于早期深度学习的对象检测算法(如R-CNN和快速R-CNN)使用称为选择性搜索的方法来缩小算法必须测试的边界框的数量。
另一种称为Overfeat的方法涉及使用滑动窗口式机制以多个比例扫描图像。
紧随其后的是更快的R-CNN,它使用区域提议网络(RPN)来识别需要测试的边界框。通过巧妙的设计,提取用于识别对象的特征也被RPN用于提出潜在的边界框,从而节省了大量的计算。
另一方面,YOLO以完全不同的方式处理对象检测问题。它只通过网络转发整个图像一次。SSD是另一种物体检测算法,它通过深度学习网络将图像转发一次,但YOLOv3比SSD快得多,同时实现了非常可比的精度。YOLOv3在M40,TitanX或1080 Ti GPU上提供比实时结果更快的速度。
让我们看看YOLO如何检测给定图像中的对象。
首先,它将图像划分为13×13的单元格。这169个单元的大小取决于输入的大小。对于我们在实验中使用的416×416输入尺寸,单元尺寸为32×32。然后每个单元负责预测图像中的多个框。
对于每个边界框,网络还预测边界框实际包围对象的置信度,以及封闭对象是特定类的概率。
大多数这些边界框都被消除了,因为它们的置信度很低,或者因为它们与另一个具有非常高置信度得分的边界框包围相同的对象。该技术称为非最大抑制。
YOLOv3,Joseph Redmon和Ali Farhadi 的作者使YOLOv3比以前的作品YOLOv2更快,更准确。YOLOv3可以更好地处理多个秤。他们还通过增加网络来改进网络,并通过添加快捷连接将网络扩展到剩余网络。
在Darknet和OpenCV上对YOLOv3进行速度测试
下表显示了YOLOv3在Darknet与OpenCV上的性能。所有情况下的输入大小为416×416。毫无疑问,Darknet的GPU版本优于其他任何东西。使用OpenMP的Darknet比没有OpenMP的Darknet工作得更好也不足为奇,因为OpenMP允许使用多个处理器。
令人惊讶的是,OpenCV的DNN CPU实现速度比使用OpenML的Darknet快9倍。
| OS | Framework | CPU/GPU | Time(ms)/Frame |
|---|---|---|---|
| Linux 16.04 | Darknet | 12x Intel Core i7-6850K CPU @ 3.60GHz | 9370 |
| Linux 16.04 | Darknet + OpenMP | 12x Intel Core i7-6850K CPU @ 3.60GHz | 1942 |
| Linux 16.04 | OpenCV [CPU] | 12x Intel Core i7-6850K CPU @ 3.60GHz | 220 |
| Linux 16.04 | Darknet | NVIDIA GeForce 1080 Ti GPU | 23 |
| macOS | DarkNet | 2.5 GHz Intel Core i7 CPU | 7260 |
| macOS | OpenCV [CPU] | 2.5 GHz Intel Core i7 CPU | 400 |
第1步:下载模型
我们将从命令行使用脚本文件getModels.sh下载模型开始。
|
1 2 |
sudo chmod a+x getModels.sh ./getModels.sh |
这将下载yolov3.weights文件(包含预先训练的网络权重),yolov3.cfg文件(包含网络配置)和coco.names文件,其中包含COCO数据集中使用的80个不同的类名。
第2步:初始化参数
YOLOv3算法生成边界框作为预测的检测输出。每个预测的框都与置信度得分相关联。在第一阶段,忽略置信度阈值参数以下的所有框以进行进一步处理。
其余的盒子经历非最大限度的抑制,这消除了多余的重叠边界框。非最大抑制由参数nmsThreshold控制。您可以尝试更改这些值,并查看输出预测框的数量如何变化。
接下来,设置网络输入图像的输入宽度(inpWidth)和高度(inpHeight)的默认值。我们将它们中的每一个设置为416,以便我们可以将我们的运行与YOLOv3作者给出的Darknet的C代码进行比较。您也可以将它们更改为320以获得更快的结果,或者更改为608以获得更准确的结果。
|
1 2 3 4 5 |
# Initialize the parameters confThreshold = 0.5 #Confidence threshold nmsThreshold = 0.4 #Non-maximum suppression threshold inpWidth = 416 #Width of network's input image inpHeight = 416 #Height of network's input image |
第3步:加载模型和类
文件coco.names包含训练模型的所有对象。我们读了班级名字。
接下来,我们加载网络有两个部分 –
- yolov3.weights:预训练的重量。
- yolov3.cfg:配置文件。
我们在这里将DNN后端设置为OpenCV,将目标设置为CPU。您可以尝试将首选目标设置为cv.dnn.DNN_TARGET_OPENCL以在GPU上运行它。但请记住,目前的OpenCV版本仅使用英特尔的GPU进行测试,如果您没有英特尔GPU,它会自动切换到CPU。
# Load names of classes
classesFile = “coco.names”;
classes = None
with open(classesFile, ‘rt’) as f:
classes = f.read().rstrip(‘\n’).split(‘\n’)
# Give the configuration and weight files for the model and load the network using them.
modelConfiguration = “yolov3.cfg”;
modelWeights = “yolov3.weights”;
net = cv.dnn.readNetFromDarknet(modelConfiguration, modelWeights)
net.setPreferableBackend(cv.dnn.DNN_BACKEND_OPENCV)
net.setPreferableTarget(cv.dnn.DNN_TARGET_CPU)
第4步:阅读输入
在此步骤中,我们将读取图像,视频流或网络摄像头。此外,我们还打开视频编写器以保存具有检测到的输出边界框的帧。
|
1 2 3 4 5 6 7 8 9 10 11 12 13 14 15 16 17 18 19 20 21 22 |
outputFile = "yolo_out_py.avi" if (args.image): # Open the image file if not os.path.isfile(args.image): print("Input image file ", args.image, " doesn't exist") sys.exit(1) cap = cv.VideoCapture(args.image) outputFile = args.image[:-4]+'_yolo_out_py.jpg' elif (args.video): # Open the video file if not os.path.isfile(args.video): print("Input video file ", args.video, " doesn't exist") sys.exit(1) cap = cv.VideoCapture(args.video) outputFile = args.video[:-4]+'_yolo_out_py.avi' else: # Webcam input cap = cv.VideoCapture(0) # Get the video writer initialized to save the output video if (not args.image): vid_writer = cv.VideoWriter(outputFile, cv.VideoWriter_fourcc('M','J','P','G'), 30, (round(cap.get(cv.CAP_PROP_FRAME_WIDTH)),round(cap.get(cv.CAP_PROP_FRAME_HEIGHT)))) |
神经网络的输入图像需要采用称为blob的特定格式。
从输入图像或视频流中读取帧后,将通过blobFromImage函数将其转换为神经网络的输入blob。在此过程中,它使用比例因子1/255将图像像素值缩放到0到1的目标范围。它还将图像的大小调整为给定大小(416,416)而不进行裁剪。请注意,我们不在此处执行任何均值减法,因此将[0,0,0]传递给函数的mean参数,并将swapRB参数保持为其默认值1。
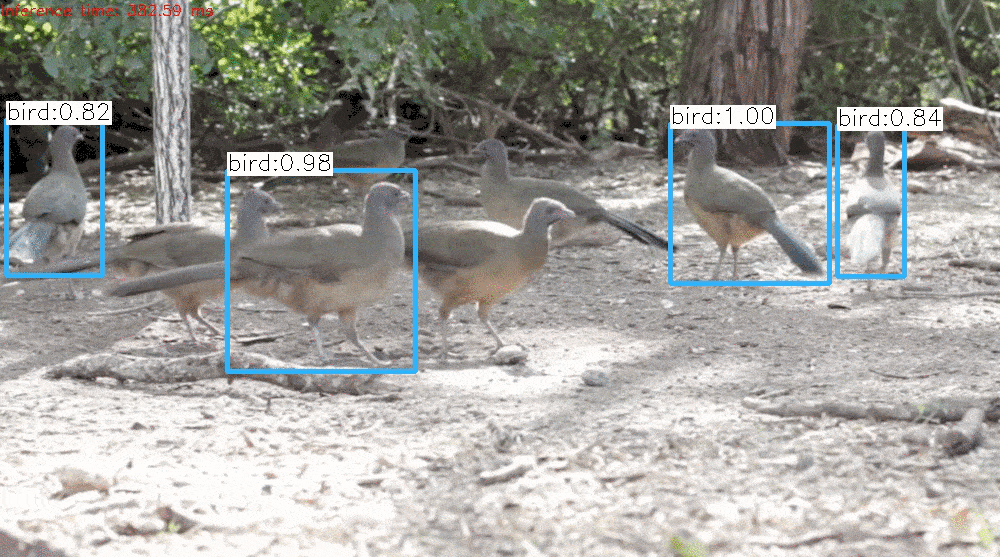
然后输出blob作为输入传递到网络,并运行正向传递以获得预测边界框列表作为网络输出。这些框经过后处理步骤,以滤除低置信度分数。我们将在下一节中更详细地介绍后处理步骤。我们打印出左上角每帧的推理时间。然后将具有最终边界框的图像保存到磁盘,作为图像输入的图像或使用输入视频流的视频写入器。
|
1 2 3 4 5 6 7 8 9 10 11 12 13 14 15 16 17 18 19 20 21 22 23 24 25 26 27 28 29 30 31 32 33 34 35 |
while cv.waitKey(1) < 0: # get frame from the video hasFrame, frame = cap.read() # Stop the program if reached end of video if not hasFrame: print("Done processing !!!") print("Output file is stored as ", outputFile) cv.waitKey(3000) break # Create a 4D blob from a frame. blob = cv.dnn.blobFromImage(frame, 1/255, (inpWidth, inpHeight), [0,0,0], 1, crop=False) # Sets the input to the network net.setInput(blob) # Runs the forward pass to get output of the output layers outs = net.forward(getOutputsNames(net)) # Remove the bounding boxes with low confidence postprocess(frame, outs) # Put efficiency information. The function getPerfProfile returns the # overall time for inference(t) and the timings for each of the layers(in layersTimes) t, _ = net.getPerfProfile() label = 'Inference time: %.2f ms' % (t * 1000.0 / cv.getTickFrequency()) cv.putText(frame, label, (0, 15), cv.FONT_HERSHEY_SIMPLEX, 0.5, (0, 0, 255)) # Write the frame with the detection boxes if (args.image): cv.imwrite(outputFile, frame.astype(np.uint8)); else: vid_writer.write(frame.astype(np.uint8)) |
现在让我们详细了解上面使用的一些函数调用。
步骤4a:获取输出层的名称
OpenCV的Net类中的forward函数需要结束层,它应该在网络中运行。由于我们想要遍历整个网络,我们需要确定网络的最后一层。我们通过使用函数getUnconnectedOutLayers()来实现这一点,该函数给出了未连接的输出层的名称,这些输出层基本上是网络的最后一层。然后我们运行网络的正向传递以从输出层获得输出,如前面的代码片段(net.forward(getOutputsNames(net)))。
|
1 2 3 4 5 6 |
# Get the names of the output layers def getOutputsNames(net): # Get the names of all the layers in the network layersNames = net.getLayerNames() # Get the names of the output layers, i.e. the layers with unconnected outputs return [layersNames[i[0] - 1] for i in net.getUnconnectedOutLayers()] |
步骤4b:后处理网络的输出
网络输出边界框每个都由一组+5个元素的向量表示。
前4个元素代表center_x,center_y,width和height。第五个元素表示边界框包围对象的置信度。
其余元素是与每个类相关的置信度(即对象类型)。该框被分配到与该框的最高分相对应的类。
盒子的最高分也被称为信心。如果框的置信度小于给定阈值,则删除边界框并且不考虑进行进一步处理。
然后对其置信度等于或大于置信度阈值的框进行非最大抑制。这将减少重叠框的数量。
|
1 2 3 4 5 6 7 8 9 10 11 12 13 14 15 16 17 18 19 20 21 22 23 24 25 26 27 28 29 30 31 32 33 34 35 36 37 38 39 40 |
# Remove the bounding boxes with low confidence using non-maxima suppression def postprocess(frame, outs): frameHeight = frame.shape[0] frameWidth = frame.shape[1] classIds = [] confidences = [] boxes = [] # Scan through all the bounding boxes output from the network and keep only the # ones with high confidence scores. Assign the box's class label as the class with the highest score. classIds = [] confidences = [] boxes = [] for out in outs: for detection in out: scores = detection[5:] classId = np.argmax(scores) confidence = scores[classId] if confidence > confThreshold: center_x = int(detection[0] * frameWidth) center_y = int(detection[1] * frameHeight) width = int(detection[2] * frameWidth) height = int(detection[3] * frameHeight) left = int(center_x - width / 2) top = int(center_y - height / 2) classIds.append(classId) confidences.append(float(confidence)) boxes.append([left, top, width, height]) # Perform non maximum suppression to eliminate redundant overlapping boxes with # lower confidences. indices = cv.dnn.NMSBoxes(boxes, confidences, confThreshold, nmsThreshold) for i in indices: i = i[0] box = boxes[i] left = box[0] top = box[1] width = box[2] height = box[3] drawPred(classIds[i], confidences[i], left, top, left + width, top + height) |
非最大抑制由nmsThreshold参数控制。如果nmsThreshold设置得太低,例如0.1,我们可能无法检测到相同或不同类的重叠对象。但如果设置得太高,例如1,那么我们会为同一个对象获得多个框。所以我们在上面的代码中使用了0.4的中间值。下面的gif显示了改变NMS阈值的效果。
步骤4c:绘制预测的框
最后,我们在输入框架上绘制通过非最大抑制过滤的框,其中包含指定的类标签和置信度分数。
|
1 2 3 4 5 6 7 8 9 10 11 12 13 14 15 16 |
# Draw the predicted bounding box def drawPred(classId, conf, left, top, right, bottom): # Draw a bounding box. cv.rectangle(frame, (left, top), (right, bottom), (0, 0, 255)) label = '%.2f' % conf # Get the label for the class name and its confidence if classes: assert(classId < len(classes)) label = '%s:%s' % (classes[classId], label) #Display the label at the top of the bounding box labelSize, baseLine = cv.getTextSize(label, cv.FONT_HERSHEY_SIMPLEX, 0.5, 1) top = max(top, labelSize[1]) cv.putText(frame, label, (left, top), cv.FONT_HERSHEY_SIMPLEX, 0.5, (255,255,255)) |
源码下载地址:
隐藏内容,解锁需要先评论本文
评论后刷新解锁


觉得很有用,想试试
对我很有帮助
getOutputsNames(net)这个函数是用来定义,整个网络的输入输出层的吗
很厉害
6很厉害
很有帮助!