使用Python/C++调用tensorflow教程
1 准备工作
全文参考此链接:
目前测试成功的系统配置为:
- ubuntu16.04
- gcc-4.8
- g++-4.8
- bazel 0.15.0
- tensorflow r1.12
- JDK8
1.1 获取数据集
您已经在Keras中构建了一个非常棒的机器学习模型,现在您希望通过Tensorflow本机运行它。本教程将向您展示如何。可以从https://github.com/bitbionic/keras-to-tensorflow.git克隆/下载本教程中的所有代码 。您可能希望克隆它以跟随它。
Keras是用于构建机器学习模型的精彩高级框架。它可以利用Tensorflow 或Theano等多个后端来实现这一目标。当通过.save方法保存Keras模型时,规范保存方法序列化为HDF5格式。Tensorflow与协议缓冲区配合使用,因此可以加载和保存.pb文件。本教程演示如何:
- 在Keras中构建SIMPLE卷积神经网络用于图像分类
- 将Keras模型保存为HDF5模型
- 验证Keras模型
- 将HDF5模型转换为协议缓冲区
- 构建Tensorflow C ++共享库
- 在纯Tensorflow应用程序中使用.pb
- 我们将使用Tensorflow自己的示例代码
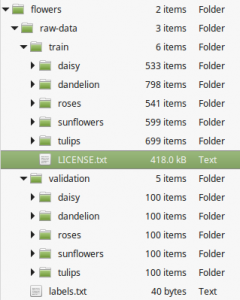
它大约是218 MB,您可以从http://download.tensorflow.org/example_images/flower_photos.tgz下载它。 提取数据后,您应该看到与此处显示的图像类似的文件夹结构。有5个类别,数据预先分类到测试和训练中。

1.2 训练你的模型
在这个例子中,我将使用非常简单的CNN,但移植模型的技术同样适用于内置的Keras模型,如Inception和ResNet。我并不幻想这个模型会赢得任何奖项,但它将符合我们的目的。
下面列出的代码有几点需要注意:
- 标记输入和输出层 – 这将使模型转换时更容易调试。
- 我依靠模型检查点来保存我的.h5文件 – 你也可以在训练结束后调用classifier.save。
- 记下您使用的形状参数,我们将在以后运行模型时需要它。
下面是使用的命令过程:
|
1 2 3 4 5 6 7 8 9 10 11 12 13 14 15 16 17 18 19 20 21 22 23 |
python k2tf_trainer.py -h Using TensorFlow backend. usage: k2tf_trainer.py [-h] --test TEST --train TRAIN --cats CATEGORIES [--output OUTPUT] [--batch BATCH] [--epochs EPOCHS] [--shape SHAPE] optional arguments: -h, --help show this help message and exit --test TEST (REQUIRED) location of the test directory --train TRAIN (REQUIRED) location of the test directory --cats CATEGORIES, -c CATEGORIES (REQUIRED) number of categories for the model to learn --output OUTPUT, -o OUTPUT location of the output directory (default:./) --batch BATCH, -b BATCH batch size (default:32) --epochs EPOCHS, -e EPOCHS number of epochs to run (default:30) --shape SHAPE, -s SHAPE The shape of the image, single dimension will be applied to height and width (default:128) python k2tf_trainer.py --test=../../data/flowers/raw-data/validation --train=../../data/flowers/raw-data/train --cats=5 --shape=80 --batch=120 --epochs=400 --output=./temp |
1.3 测试你的模型
所以现在让我们对我们的模型进行快速检查 – 这是一个加载模型,图像,形状和索引的小脚本(特别是如果你没有使用花集),以下是我的例子:
|
1 2 3 4 5 6 7 8 9 10 11 12 13 14 15 16 17 18 19 20 21 22 23 24 25 26 27 28 29 30 31 32 33 34 35 36 37 38 39 40 41 42 43 44 45 46 47 48 49 50 51 52 |
python k2tf_eval.py -h Using TensorFlow backend. usage: k2tf_eval.py [-h] --model MODEL --image IMAGE --shape SHAPE [--labels LABELS] optional arguments: -h, --help show this help message and exit --model MODEL, -m MODEL The HDF5 Keras model you wish to run --image IMAGE, -i IMAGE The image you wish to test --shape SHAPE, -s SHAPE The shape to resize the image for the model --labels LABELS, -l LABELS The indices.txt file containing the class_indices of the Keras training set ###################### # LETS TRY A DANDELION ###################### python k2tf_eval.py -m '/home/bitwise/Development/keras-to-tensorflow/temp/k2tf-20170816140235/e-075-vl-0.481-va-0.837.h5' -i '/home/bitwise/data/flowers/raw-data/validation/dandelion/13920113_f03e867ea7_m.jpg' -s 80 Using TensorFlow backend. daisy : 0.02 percent dandelion : 99.95 percent roses : 0.02 percent sunflowers : 0.00 percent tulips : 0.01 percent ###################### # LETS TRY A ROSE ###################### python k2tf_eval.py -m '/home/bitwise/Development/keras-to-tensorflow/temp/k2tf-20170816140235/e-075-vl-0.481-va-0.837.h5' -i '/home/bitwise/data/flowers/raw-data/validation/roses/160954292_6c2b4fda65_n.jpg' -s 80 Using TensorFlow backend. daisy : 1.85 percent dandelion : 0.14 percent roses : 70.67 percent sunflowers : 0.01 percent tulips : 27.33 percent ###################### # LETS TRY A TULIP ###################### python k2tf_eval.py -m '/home/bitwise/Development/keras-to-tensorflow/temp/k2tf-20170816140235/e-075-vl-0.481-va-0.837.h5' -i '/home/bitwise/data/flowers/raw-data/validation/tulips/450607536_4fd9f5d17c_m.jpg' -s 80 Using TensorFlow backend. daisy : 0.00 percent dandelion : 0.00 percent roses : 1.65 percent sunflowers : 0.52 percent tulips : 97.83 percent |
1.4 从HDF5转换为.pb
归因:此脚本改编自https://github.com/amir-abdi/keras_to_tensorflow
我将上面链接中的笔记本改为我们可以从命令行运行的脚本。除了参数解析之外,代码几乎相同。此代码执行以下操作:
- 加载.h5文件
- 用命名的Identity Tensor替换你的输出张量 – 如果你使用的是你没有构建的模型并且不知道所有的输出名称(当然你可以去挖掘,这可能会有用) )。
- 保存图形定义的ASCII表示。我使用它来验证Tensorflow的输入和输出名称。这在调试中很有用。
- 将图中的所有变量替换为常量。
- 将结果图形写入您在脚本中指定的输出名称。
下面是命令过程:
|
1 2 3 4 5 6 7 8 9 10 11 12 13 14 15 16 17 18 19 20 21 22 23 24 25 26 27 28 |
python k2tf_convert.py -h Using TensorFlow backend. usage: k2tf_convert.py [-h] --model MODEL --numout NUM_OUT [--outdir OUTDIR] [--prefix PREFIX] [--name NAME] optional arguments: -h, --help show this help message and exit --model MODEL, -m MODEL REQUIRED: The HDF5 Keras model you wish to convert to .pb --numout NUM_OUT, -n NUM_OUT REQUIRED: The number of outputs in the model. --outdir OUTDIR, -o OUTDIR The directory to place the output files - default("./") --prefix PREFIX, -p PREFIX The prefix for the output aliasing - default("k2tfout") --name NAME The name of the resulting output graph - default("output_graph.pb") python k2tf_convert.py -m '/home/bitwise/Development/keras-to-tensorflow/temp/k2tf-20170816140235/e-075-vl-0.481-va-0.837.h5' -n 1 Using TensorFlow backend Output nodes names are: ['k2tfout_0'] Saved the graph definition in ascii format at: ./graph_def_for_reference.pb.ascii Converted 10 variables to const ops. Saved the constant graph (ready for inference) at: ./output_graph.pb |
如您所见,写出了两个文件。ASCII和.pb文件。让我们看看图形结构,注意输入节点名称“firstConv2D_input”和输出名称“k2tfout_0”,我们将在下一节中使用它们:
2 使用Tensorflow的label_image示例
2.1 使用python
本教程的其余部分将大量利用Tensorflow的图像识别示例。具体而言该文件为Python和此文件中的C ++。
我将这两个文件复制到本教程的git repo中。现在让我们测试一下。
使用Python运行Tensorflow模型
运行Python脚本非常简单。请记住,我们需要提供以下参数:
- 我们上面生成的output_graph.pb
- 标签文件 – 这是随数据集提供的,但您可以从我们在Keras模型培训中生成的indices.txt文件生成类似的labels.txt
- 输入宽度和高度。记得我训练过80×80,所以我必须在这里进行调整
- 输入层名称 – 我在上面转换的生成的ASCII文件中找到了这个。在这种情况下,它是“firstConv2D_input” – 记住我们的k2tf_trainer.py命名为第一层“firstConv2D”。
- 输出层名称 – 我们用前缀创建了它,可以在我们的ASCII文件中验证它。我们使用脚本默认值“k2tfout_0”
- 最后,我们想要处理的图像。
我们来试试吧:
|
1 2 3 4 5 6 7 8 9 10 11 12 13 14 15 16 17 18 19 20 21 22 23 24 25 26 27 28 29 30 31 32 33 34 35 36 37 38 39 40 41 42 43 44 45 46 47 48 49 50 51 52 53 54 |
python label_image.py -h usage: label_image.py [-h] [--image IMAGE] [--graph GRAPH] [--labels LABELS] [--input_height INPUT_HEIGHT] [--input_width INPUT_WIDTH] [--input_mean INPUT_MEAN] [--input_std INPUT_STD] [--input_layer INPUT_LAYER] [--output_layer OUTPUT_LAYER] optional arguments: -h, --help show this help message and exit --image IMAGE image to be processed --graph GRAPH graph/model to be executed --labels LABELS name of file containing labels --input_height INPUT_HEIGHT input height --input_width INPUT_WIDTH input width --input_mean INPUT_MEAN input mean --input_std INPUT_STD input std --input_layer INPUT_LAYER name of input layer --output_layer OUTPUT_LAYER name of output layer ###################### # LETS TRY A DANDELION ###################### python label_image.py --graph=./output_graph.pb --labels=../../data/flowers/raw-data/labels.txt --input_width=80 --input_height=80 --input_layer=firstConv2D_input --output_layer=k2tfout_0 --image=../../data/flowers/raw-data/validation/dandelion/13920113_f03e867ea7_m.jpg 2017-08-18 13:05:04.977442: I ./main.cpp:250] dandelion (1): 0.999625 2017-08-18 13:05:04.977517: I ./main.cpp:250] daisy (0): 0.00023931 2017-08-18 13:05:04.977530: I ./main.cpp:250] roses (2): 8.84324e-05 2017-08-18 13:05:04.977541: I ./main.cpp:250] tulips (4): 4.70001e-05 2017-08-18 13:05:04.977553: I ./main.cpp:250] sunflowers (3): 7.26905e-08 ###################### # LETS TRY A ROSE ###################### python label_image.py --graph=./output_graph.pb --labels=../../data/flowers/raw-data/labels.txt --input_width=80 --input_height=80 --input_layer=firstConv2D_input --output_layer=k2tfout_0 --image=../../data/flowers/raw-data/validation/roses/160954292_6c2b4fda65_n.jpg 2017-08-18 13:06:27.205764: I ./main.cpp:250] roses (2): 0.660571 2017-08-18 13:06:27.205834: I ./main.cpp:250] tulips (4): 0.31912 2017-08-18 13:06:27.205845: I ./main.cpp:250] daisy (0): 0.0188609 2017-08-18 13:06:27.205853: I ./main.cpp:250] dandelion (1): 0.00124337 2017-08-18 13:06:27.205862: I ./main.cpp:250] sunflowers (3): 0.000204971 ###################### # LETS TRY A TULIP ###################### python label_image.py --graph=./output_graph.pb --labels=../../data/flowers/raw-data/labels.txt --input_width=80 --input_height=80 --input_layer=firstConv2D_input --output_layer=k2tfout_0 --image=../../data/flowers/raw-data/validation/tulips/450607536_4fd9f5d17c_m.jpg 2017-08-18 13:08:08.395576: I ./main.cpp:250] tulips (4): 0.96644 2017-08-18 13:08:08.395657: I ./main.cpp:250] sunflowers (3): 0.0188329 2017-08-18 13:08:08.395669: I ./main.cpp:250] roses (2): 0.0147128 2017-08-18 13:08:08.395681: I ./main.cpp:250] daisy (0): 1.08454e-05 2017-08-18 13:08:08.395691: I ./main.cpp:250] dandelion (1): 3.82244e-06 |
所以现在Tensorflow在Python中运行我们的模型 – 但是我们如何使用C ++?
2.2 使用C ++运行Tensorflow模型
如果您还在阅读,那么我假设您需要弄清楚如何在C ++的生产环境中运行Tensorflow。
2.2.1 编译tensorflow
对于我的项目,我想要一个可以链接和部署的Tensorflow共享库。这就是我们将在此项目中构建的内容,并使用它构建label_image示例。对于tensorflow c++接口来说,只能通过源码进行编译安装,不能通过pip安装。
要在C ++中运行我们的模型,我们首先需要获取Tensorflow源代码树。该指令在这里,但我们将在下面走通他们。
|
1 2 3 4 5 6 7 8 9 10 11 12 13 14 15 16 17 18 |
(tensorflow) $ ~/Development/keras-to-tensorflow $ git clone https://github.com/tensorflow/tensorflow Cloning into 'tensorflow'... remote: Counting objects: 223667, done. remote: Compressing objects: 100% (15/15), done. remote: Total 223667 (delta 2), reused 8 (delta 0), pack-reused 223652 Receiving objects: 100% (223667/223667), 116.84 MiB | 3.17 MiB/s, done. Resolving deltas: 100% (173085/173085), done. Checking connectivity... done. (tensorflow) $ ~/Development/keras-to-tensorflow $ cd tensorflow/ (tensorflow) $ ~/Development/keras-to-tensorflow/tensorflow $ git checkout r1.1 Branch r1.1 set up to track remote branch r1.1 from origin. Switched to a new branch 'r1.12' (tensorflow) $ ~/Development/keras-to-tensorflow/tensorflow $ ls ACKNOWLEDGMENTS BUILD LICENSE tensorflow WORKSPACE ADOPTERS.md configure models.BUILD third_party AUTHORS CONTRIBUTING.md README.md tools bower.BUILD ISSUE_TEMPLATE.md RELEASE.md util (tensorflow) $ ~/Development/keras-to-tensorflow/tensorflow $ |
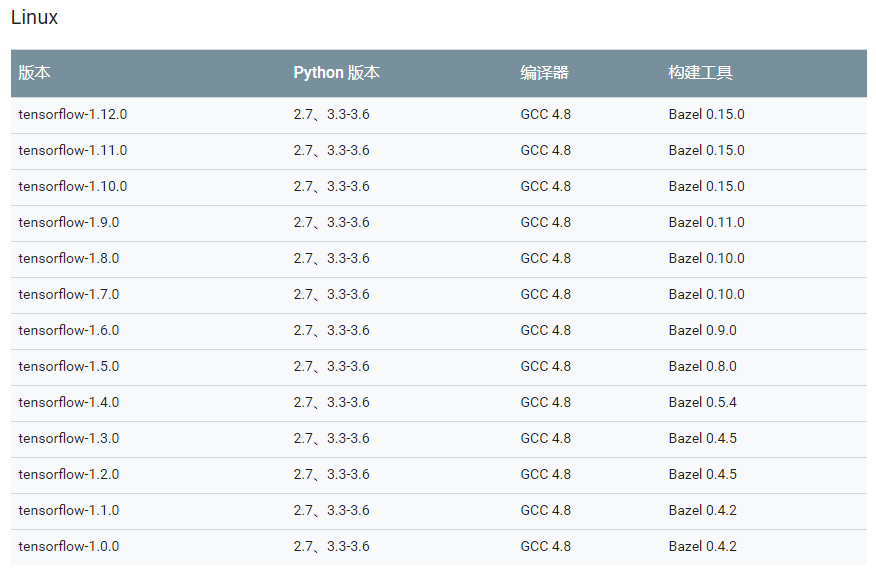
查看tensorflow的要求,我们选择bazel0.15.0,要求如下:


bazel的安装说明如下:
【mcj】bazel安装指定版本
验证以下bazel的版本信息:
bazel help
现在我们已经安装了所有东西,我们可以配置和构建。确保您位于顶级tensorflow目录中。我使用了所有默认配置选项。执行此操作时,配置工具将下载一堆依赖项 – 这需要一两分钟。
|
1 2 3 4 5 6 7 8 9 10 11 12 13 14 15 16 17 18 19 20 21 22 23 24 25 26 27 28 |
(tensorflow) $ ~/Development/keras-to-tensorflow/tensorflow $ ./configure Please specify the location of python. [Default is /home/bitwise/anaconda3/envs/tensorflow/bin/python]: Please specify optimization flags to use during compilation when bazel option "--config=opt" is specified [Default is -march=native]: Do you wish to use jemalloc as the malloc implementation? [Y/n] jemalloc enabled Do you wish to build TensorFlow with Google Cloud Platform support? [y/N] No Google Cloud Platform support will be enabled for TensorFlow Do you wish to build TensorFlow with Hadoop File System support? [y/N] No Hadoop File System support will be enabled for TensorFlow Do you wish to build TensorFlow with the XLA just-in-time compiler (experimental)? [y/N] No XLA support will be enabled for TensorFlow Found possible Python library paths: /home/bitwise/anaconda3/envs/tensorflow/lib/python3.6/site-packages Please input the desired Python library path to use. Default is [/home/bitwise/anaconda3/envs/tensorflow/lib/python3.6/site-packages] Using python library path: /home/bitwise/anaconda3/envs/tensorflow/lib/python3.6/site-packages Do you wish to build TensorFlow with OpenCL support? [y/N] No OpenCL support will be enabled for TensorFlow Do you wish to build TensorFlow with CUDA support? [y/N] No CUDA support will be enabled for TensorFlow Configuration finished INFO: Starting clean (this may take a while). Consider using --expunge_async if the clean takes more than several minutes. ............ WARNING: ~/.cache/bazel/_bazel_bitwise/7f7ca38846ebb2cb18e80e7c35ca353a/external/bazel_tools/tools/build_defs/pkg/pkg.bzl:196:9: pkg_tar: renaming non-dict `files` attribute to `srcs` WARNING: ~/.cache/bazel/_bazel_bitwise/7f7ca38846ebb2cb18e80e7c35ca353a/external/bazel_tools/tools/build_defs/pkg/pkg.bzl:196:9: pkg_tar: renaming non-dict `files` attribute to `srcs` WARNING: ~/.cache/bazel/_bazel_bitwise/7f7ca38846ebb2cb18e80e7c35ca353a/external/bazel_tools/tools/build_defs/pkg/pkg.bzl:196:9: pkg_tar: renaming non-dict `files` attribute to `srcs` WARNING: ~/.cache/bazel/_bazel_bitwise/7f7ca38846ebb2cb18e80e7c35ca353a/external/bazel_tools/tools/build_defs/pkg/pkg.bzl:196:9: pkg_tar: renaming non-dict `files` attribute to `srcs` Building: no action running |
接下来进行build,如下:
bazel build --jobs=6 --verbose_failures -c opt --copt=-mavx --copt=-mfpmath=both --copt=-msse4.2 //tensorflow:libtensorflow_cc.so
上面是ubuntu下进行编译tensorflow,对于centos来说,类似,只不过bazel安装更加简单。
2.2.2 编译程序
在教程git repo中,我包含了一个qmake .pro文件,该文件链接.so和所有必需的标头位置。我将它包括在内作为参考 – 你不需要qmake来构建它。实际上,我要包含要构建的g ++命令。您可能需要根据您的环境进行调整。假设您正在从repo的根目录构建main.cpp,并且我们刚刚创建的tensorflow构建被克隆并构建在同一目录中,所有路径都应该是相对的并且开箱即用。
下面是编译命令:
|
1 2 3 |
g++ -c -pipe -g -std=gnu++11 -Wall -W -fPIC -I. -I./tensorflow -I./tensorflow/bazel-tensorflow/external/eigen_archive -I./tensorflow/bazel-tensorflow/external/protobuf/src -I./tensorflow/bazel-genfiles -o main.o ./main.cpp g++ -o Tutorial main.o -L./tensorflow/bazel-bin/tensorflow -ltensorflow_cc cp ./tensorflow/bazel-bin/tensorflow/libtensorflow* . |
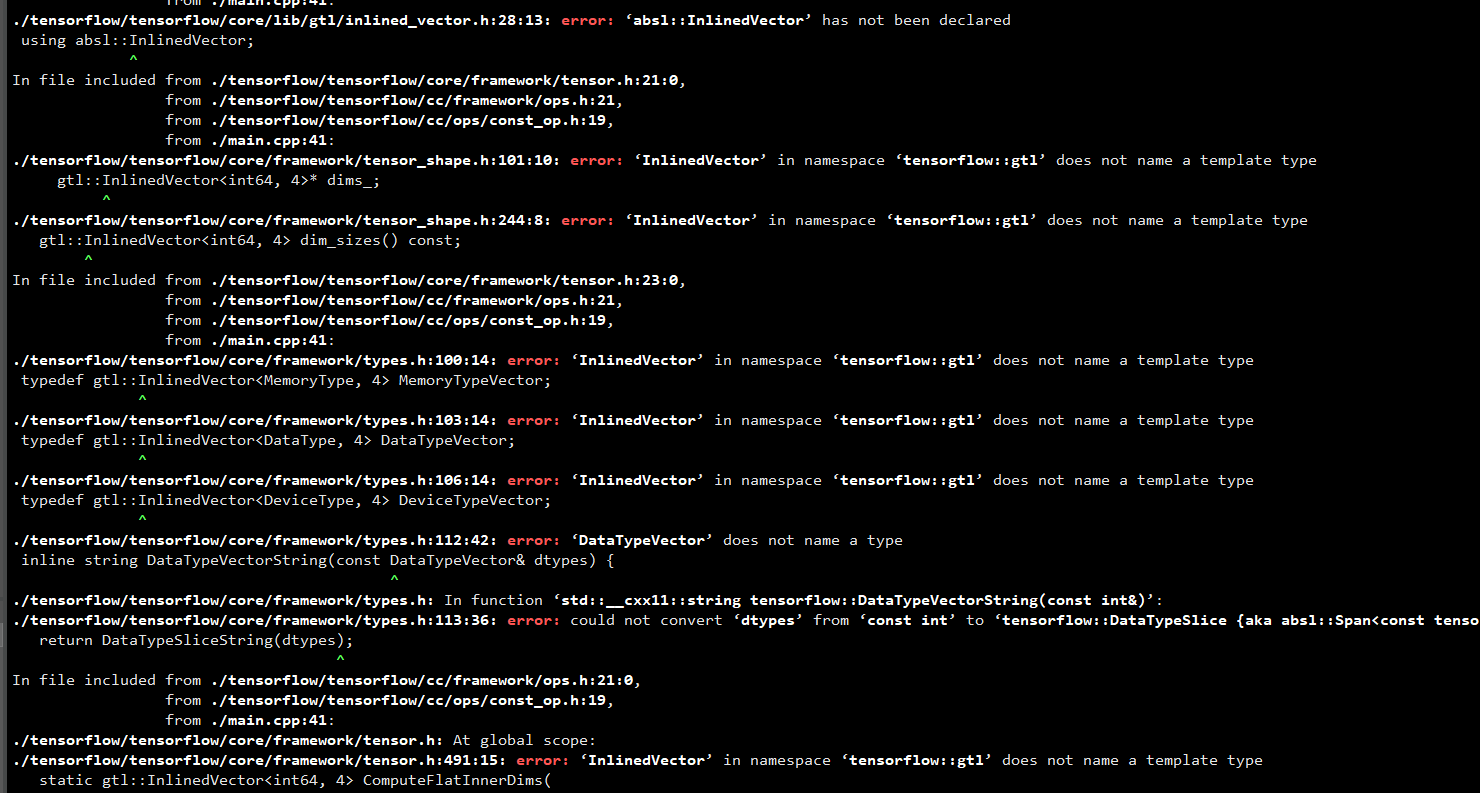
执行第一条命令的时候总是出现错误:

然后进行debug,发现是absl这个文件的问题,找到absl这个文件,然后放到tensorflow目录下,重新执行,这时,只剩下这三条错误:

按照@李丰存 的帮助,那就不用TensorFlow 的StringPiece了,直接修改代码使用C++的string 。把用到StringPiece 的地方函数用相应的string 的函数实现。
这是修改后的main.cpp文件:
https://www.jianguoyun.com/p/DfisZ-0QwYPTBhjf6ZwB
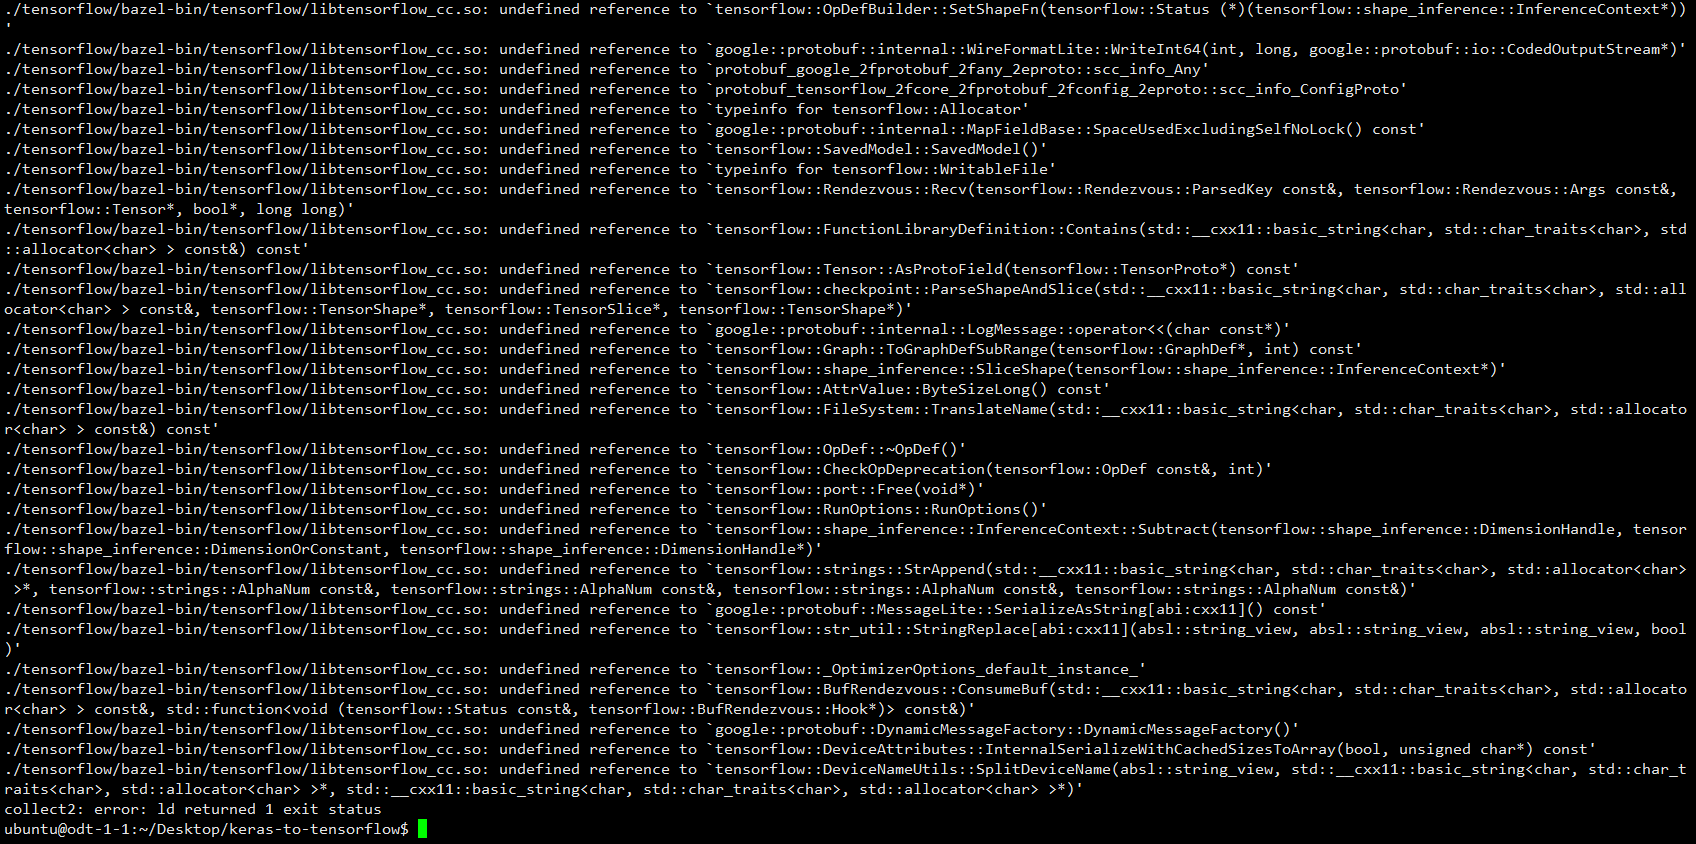
接着执行第二条命令,结果报错:

找了好多方法,最后在github上找到的,将:
g++ -o Tutorial main.o -L./tensorflow/bazel-bin/tensorflow -ltensorflow_cc替换为:
g++ -std=c++11 -o Tutorial main.bak.o -L./tensorflow/bazel-bin/tensorflow -ltensorflow_cc -I./tensorflow -I./tensorflow/bazel-tensorflow/external/eigen_archive -I./tensorflow/bazel-tensorflow/external/protobuf/src -I./tensorflow/bazel-genfiles -I/usr/include/eigen3 -ltensorflow_cc -ltensorflow_framework
中间安装了eigen3、G++-4.8不知道跟这个有没有关系。
好了,到这一步就得到Tutorial 这个文件了,使用./Tutorial -h应该能得到使用帮助,可是我在这一步的时候又报错,说找不到libtensorflow_cc.so文件:
./Tutorial: error while loading shared libraries: libtensorflow_cc.so: cannot open shared object file: No such file or directory
于是将这个文件所在的路径包含在/etc/ld.so.conf这个文件里,然后ldconfig一下,再重新执行./Tutorial -h就行了。

执行一个命令试试:
./Tutorial --graph=./output_graph.pb --labels=./data/flowers/raw-data/labels.txt --input_width=80 --input_height=80 --input_layer=firstConv2D_input --output_layer=k2tfout_0 --image=./data/flowers/raw-data/validation/dandelion/13920113_f03e867ea7_m.jpg

完成。
接下来的工作就是修改main.cpp,然后使其可以读取我们自己训练的faster rcnn模型了。
3 使用c++调用对方给的faster模型
3.1 ubuntu
@李丰存 给了一个main1.cpp的文件,里面是经过了修改的可以调用给定模型。经过前面的环境搭建之后,同样,先对cpp文件进行build
|
1 |
g++ -c -pipe -g -std=gnu++11 -Wall -W -fPIC -I. -I./tensorflow -I./tensorflow/bazel-tensorflow/external/eigen_archive -I./tensorflow/bazel-tensorflow/external/protobuf/src -I./tensorflow/bazel-genfiles -o mainfaster.o ./main1.cpp |
这一步没有问题,只是有一些警告,没有错误。
然后进行下一步:
|
1 |
g++ -std=c++11 -o Tutorialfaster mainfaster.o -L./tensorflow/bazel-bin/tensorflow -ltensorflow_cc -I./tensorflow -I./tensorflow/bazel-tensorflow/external/eigen_archive -I./tensorflow/bazel-tensorflow/external/protobuf/src -I./tensorflow/bazel-genfiles -I/usr/include/eigen3 -ltensorflow_cc -ltensorflow_framework |
在这一步的时候出现了错误:

应该是没有添加合适的依赖造成的,于是增加:
|
1 |
g++ -std=c++11 -o Tutorialfaster mainfaster.o -L./tensorflow/bazel-bin/tensorflow -ltensorflow_cc -I./tensorflow -I./tensorflow/bazel-tensorflow/external/eigen_archive -I./tensorflow/bazel-tensorflow/external/protobuf/src -I./tensorflow/bazel-genfiles -I/usr/include/eigen3 -ltensorflow_cc -ltensorflow_framework -L/usr/local/lib -I/usr/local/include/opencv -L/usr/local/lib -lopencv_core -lopencv_highgui -lpthread -lrt |
这时错误少了一些:

在这里:https://bbs.csdn.net/topics/390206286,找到了一个解决方法,于是添加
-I /usr/local/include/opencv -L /usr/local/lib -lopencv_core -lopencv_highgui -lopencv_imgproc -lopencv_gpu -lopencv_ts -lopencv_video -lopencv_objdetect -lopencv_ml -lpthread,即:
|
1 |
g++ -std=c++11 -o Tutorialfaster mainfaster.o -L./tensorflow/bazel-bin/tensorflow -ltensorflow_cc -I./tensorflow -I./tensorflow/bazel-tensorflow/external/eigen_archive -I./tensorflow/bazel-tensorflow/external/protobuf/src -I./tensorflow/bazel-genfiles -I/usr/include/eigen3 -ltensorflow_cc -ltensorflow_framework -L/usr/local/lib -I/usr/local/include/opencv -L/usr/local/lib -lopencv_core -lopencv_highgui -lpthread -lrt -I /usr/local/include/opencv -L /usr/local/lib -lopencv_core -lopencv_highgui -lopencv_imgproc -lopencv_gpu -lopencv_ts -lopencv_video -lopencv_objdetect -lopencv_ml -lpthread |
这时错误又少了几个,看出来是有效的。

精简了一下,变成下面:
|
1 |
g++ -std=c++11 -o Tutorialfaster mainfaster.o -L./tensorflow/bazel-bin/tensorflow -ltensorflow_cc -I./tensorflow -I./tensorflow/bazel-tensorflow/external/eigen_archive -I./tensorflow/bazel-tensorflow/external/protobuf/src -I./tensorflow/bazel-genfiles -I/usr/include/eigen3 -ltensorflow_cc -ltensorflow_framework -L/usr/local/lib -lopencv_core -lopencv_imgproc |
针对最后两个错误,imread和imwrite,导致错误的原因是由于忘记添加opencv_imgcodecs。自opencv3.0之后,图像读取相关代码在imgcodes中。因此,加上这个依赖就行了。最终命令如下:
|
1 |
g++ -std=c++11 -o Tutorialfaster mainfaster.o -L./tensorflow/bazel-bin/tensorflow -ltensorflow_cc -I./tensorflow -I./tensorflow/bazel-tensorflow/external/eigen_archive -I./tensorflow/bazel-tensorflow/external/protobuf/src -I./tensorflow/bazel-genfiles -I/usr/include/eigen3 -ltensorflow_cc -ltensorflow_framework -L/usr/local/lib -lopencv_core -lopencv_imgproc -lopencv_imgcodecs |
3.2 centos
上面是ubuntu下的编译过程,下面是centos中遇到的问题:

遇到的主要问题是bazel版本问题和protobuf的版本问题,tensorflowr1.12版本所需bazel版本为0.15.0。还有,r1.12需要的protobuf版本为3.6.0以上,我装了3.6.1之后,仍然报错:
查找多个地方之后,决定忽略这个错误,找到相对应的错误文件,将对应错误输出代码删掉,问题解决。
对于上述致命错误,需要下载absl,然后将其放到tensorflow目录,在命令后加入-I./tensorflow/abseil-cpp/即可。
除了tensorflow,opencv的依赖添加也有问题。最终在centos下进行编译的完整命令为:
|
1 2 |
g++ -c -pipe -g -std=gnu++11 -Wall -W -fPIC -I/usr/local/protobuf -I/usr/local/protobuf/include -I./tensorflow -I./tensorflow/bazel-tensorflow/external/eigen_archive -I./tensorflow/bazel-tensorflow/external/protobuf/src -I./tensorflow/bazel-genfiles -L/usr/local/protobuf -L/usr/local/protobuf/include -I./tensorflow/abseil-cpp/ -o mainfaster.o ./main.cpp |
|
1 |
g++ -std=c++11 -o Tutorialfaster mainfaster.o -L./tensorflow/bazel-bin/tensorflow -ltensorflow_cc -I./tensorflow -I./tensorflow/bazel-tensorflow/external/eigen_archive -I./tensorflow/bazel-tensorflow/external/protobuf/src -I./tensorflow/bazel-genfiles -I/usr/include/eigen3 -ltensorflow_cc -ltensorflow_framework -L/usr/local/lib -lopencv_core -lopencv_imgproc -lopencv_imgcodecs -l opencv_highgui |
编译完成后,在执行的时候,会遇到错误:
./Tutorialfaster: error while loading shared libraries: libtensorflow_cc.so: cannot open shared object file: No such file or directory
解决方法为:
使用sudo cp -frap ./tensorflow/bazel-bin/tensorflow/libtensorflow* .将TensorFlow的so文件都复制到当前目录,不过其实应该选一个固定的目录代替当前目录,如/etc/lib。然后sudo ldconfig使其生效即可。
 马春杰杰
马春杰杰


